
How to Make a Sewing Pattern?
Sewing on your own is a world filled with huge possibilities, you can make whatever you want- you can make your skirt look flowy or make it pencil. You can customize it to your perfect size or make an oversized t-shirt for your comfortable nightwear.
But to achieve this- you need to have control over your designs. This is a skilled craft. The ready-made patterns serve the purpose, but often they cannot help meet specific needs like fitting different body shapes, design alteration, or creating a unique style.
When I was in your place it made me realize how much a simple mistake can ruin everything- the fit, flow & the vision. So I am here to help you as a passionate sewist.
Learning how to make your sewing pattern will give you the independence to design clothes, home decor items, and accessories with more perfection.
This guide will explain and provide tips to ensure successful pattern-making. But, before that, we need to discuss pattern denotes & understand what they are-
PATTERN DENOTES-
The pattern is a template from which the parts of the garments are traced in the form of dimension, fit, and structure. This helps in consistency, especially important and valuable for small businesses or those who make clothes for others. It provides a professional look and finish.
Why are sewing patterns important? A sewing pattern acts as a blueprint or road map, without one, it is similar to stitching without a guide which often leads to wasted fabric, frustration, and loss of confidence.
Useful Tools and Materials Needed
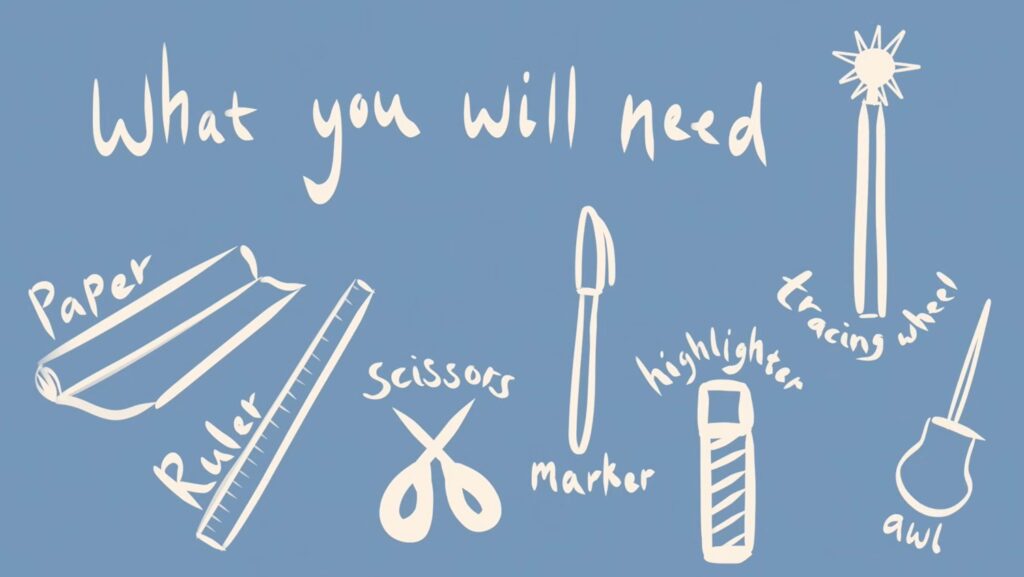
To create your pattern, you need to have a few essential tools or materials, like:
- Pattern Paper
- Measuring tape
- Ruler or French Curve
- Pencils and Erasers
- Muslin or any test fabric
- Pair of scissors
Explore Digital pattern-making tools:
If you are comfortable with technology or plan to create and store many patterns, digital pattern-making tools can be a game-changer. Seamly2D, Valentina, etc, are free options.
While tools like Adobe Illustrator and CLO 3D are widely used by professionals.
These tools help you resize, adjust, and store your patterns digitally. Most of them allow exporting patterns as PDFs so you can print them at home on A4 or US letter paper.
Useful steps to make a sewing pattern
Here are the major steps that need to be followed to make a sewing pattern for you:
-
Taking Measurements-
Correct measurements are the main pillar for any sewing pattern. For a customized pattern, you must have an accurate body measurement. Basic measurement points are:
- Shoulder width – measures from one shoulder to the other shoulder from the back.
- Arm length – measures from the top of one shoulder to the wrist bone.
- The upper arm width – measures around the thickest part of the arm near the armpit.
- Chest/ Bust measures – around the widest part of the chest/bust.
- Waist measures – around the narrowest part of the waist, just above the belly button.
- Hips measure – around the widest part of the hips.
Note – It is advisable to double-check the measurement, as later the changes may be impossible.
Understanding pattern grading for multiple sizes:
Once you have taken measurements and created a base pattern, you might want to make the same design in different sizes. This process is known as pattern grading. It means increasing or decreasing your pattern proportionally.
For example, the same dress in sizes S, M, and L. Start with the base pattern and add or subtract width and length at specific points like bust, waist, and hip based on the standard grading rules.
Pattern grading is important for those who sell patterns or make clothes for multiple people.
Adapting for Body shapes:
Everyone’s body is different, and a standard pattern may not always fit perfectly. First, it’s important to understand your body shape (pear, apple, or hourglass), so you can adjust accordingly.
For example, if you are fuller around the hips, you might need to widen that part of the pattern slightly. Don’t be afraid to blend sizes, like you can draw the bust using size M and the waist using size L if needed.
-
OUTLINING OF BLOCK PATTERN
A Block pattern also known as a sloper pattern, is a general pattern used for building blocks for creating other patterns. It is a flat representation of the body’s measurements and shapes without design features like darts, tucks, or pleats. Let’s begin:
- Start with a straight line – Take a pattern paper and place it on a flat surface, draw a vertical line down the center with the help of a pencil. This line represents the center front or center back of the garments.
Label it as the center line. - Marking key points – Mark the measurement points along the vertical lines. For example, mark where the chest/bust, waist, and hips points will be.
This will guide, in shaping the sides of the pattern. - Draw a horizontal line – Draw horizontal lines to the side from each of these points (chest/bust, waist, and hips). It represents half of the width of the chest/bust, waist, and hips measurement.
This will form the sides of the pattern. - Connecting the points – Draw lines to connect the ends of the horizontal lines. This will give a basic shape, as per the measurement taken.
Note– The shapes depend on the garments that you are making.
For example a top, t-shirt, or pants. - Draw necklines and armholes – For tops, you are required to add an armhole and a neckline. Use a French curve tool to create rounded edges.
Advice – For beginners, first try simple shapes, once you gather experience you can go for more complex designs.
Marking Pattern Symbols and Notches:
While drafting, ensure to include pattern symbols like:
- Grainline arrow: Helps you align your fabric correctly.
- Notches: Little triangle marks on edges used to match pieces.
- Darts: Triangular folds for shaping.
- Folding Lines: For placing patterns on fabric folds.
These symbols are essential in sewing and make assembling your garment much easier. Always transfer them carefully when cutting your fabric.
-
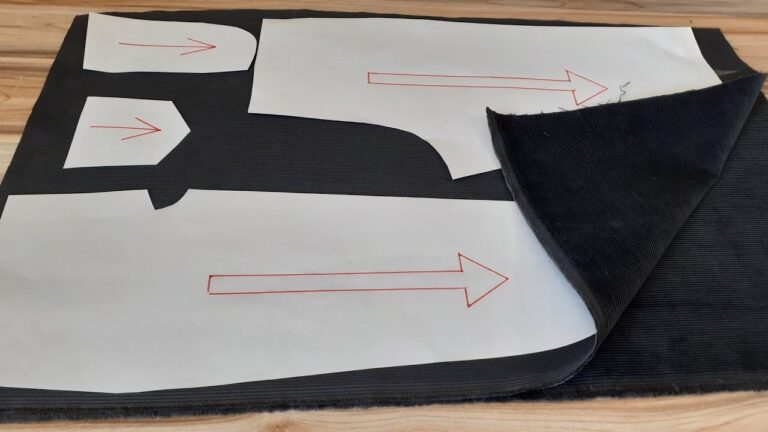
CUTOUT THE PATTERN PIECES
Once the Block pattern is ready, cut the individual pattern pieces. Follow steps:
- Tracing the block pattern – If you are marking a shirt, take a new piece of paper and trace the front bodice, back bodice, and sleeve. In the case of pants, you will trace the front and back legs.
- Adding seam allowance – This creates extra space for the pattern to fit the shape comfortably. Without it, the garment would indeed be too tight to wear.
- Cutting of pattern pieces – With the help of scissors cut the pattern pieces and label them. Mark the side that has to be placed on the fabric, if necessary fold it.
Note – Keep these cutouts safe, so that whenever it is required you can get them with ease.
Adjusting for fabric type:
Not all fabrics behave the same. For example, woven fabric like cotton won’t work well with stretchy knit fabrics unless you adjust it.
For knits, you usually need less seam allowance and fewer darts because the fabric stretches. Always check if your fabric has stretch or is stiff and adjust your pattern ease accordingly.
What is a seam allowance and why is it important?
A seam allowance is the area between the stitching line and the fabric edge when two pieces of fabric are sewn together.
In my initial days of sewing, the first project I made was a credit card holder. The only mistake was that I marked the outline area of the card on the fabric and stitched it. As a result, the folder was much smaller than the credit card. ROOKIE MISTAKE!
But it was my biggest learning and since then I always kept a seam allowance of ½ an inch from all sides, for a perfect fit.
-
TEST YOUR PATTERN
Before cutting your final fabric, test your pattern on muslin or other inexpensive fabric and sew them together as you do for your final fabric.
- Cutting and Sewing Muslin – Cut the pattern pieces and sew them together from your muslin fabric. This process is also known as making a “toile”.
- Checking the fits – Try and check the fits, if it is too tight or too loose in any area, you can adjust by adding or taking away the fabric. This means you might need to redraw certain parts or make small tweaks (adjustments).
Note– These steps will help you confirm that the pattern fits well and your design is appropriate.
-
FINALIZE YOUR PATTERN
Now you are ready to use these steps with your final fabric.
Pattern Storage and Reuse Tips:
After making a pattern, store it properly to reuse it in the future. You can keep each in a labelled envelope or folder with the pattern name, size, date, and notes, if any. If you use software, organize digital versions in folders, naming them tops, bottoms, dresses, etc.
Also, keep muslin test garments if possible. They are useful for checking fit later or reworking into new assignments. Use the leftover muslin for smaller projects or quilting. You can explore zero waste patterns that are designed to use every inch of fabric. Not only does this reduce waste, but it also encourages smarter design.
Conclusion
Drafting a blueprint, adding seam allowance, and testing your pattern will make you more skilled in sewing. You can unlock the endless possibilities for designing unique garments and home decor projects with ease.

One Comment