How to Put a Bobbin in a Sewing Machine?
Hello guys, today I will talk about “bobbin”. Before explaining how to put a bobbin in the sewing machine, it’s important to know “what is a bobbin?”. What is the function of a bobbin in sewing?
The bobbin is a plastic or metal round part of the sewing machine on which the lower thread is wound. It holds the lower thread firmly so that when you start to stitch, the lower thread is caught with the upper thread and forms a stitch. Both, top and bottom threads play a vital role in a perfect stitch. To avoid any blunders while stitching your project like breakage of the needle, breaking of lower thread frequently, jamming the lower thread, or the thread loose and forming tangles you must know to put the bobbin in the sewing machine correctly.
Be it a regular or computerized sewing machine. There are 2 different types of bobbin loading machines.
- Top bobbin loading machine.
- Front bobbin loading machine.
Most modern machines use top-loading bobbin systems due to their simplicity and visibility. However, many traditional or heavy-duty machines still come with front-loading systems, especially for thicker fabrics.
And, the method differs depending on the type of machine you have.
Is it very complicated? No worries I will explain to you in a few easy steps:
- Putting the machine in safety mode.
- Putting the bobbin in a front-loading sewing machine.
- Putting the bobbin in a top-loading sewing machine.
-
Putting the machine in safety mode
For a computerized sewing machine, put the machine in safety mode by selecting the safety mode option so that you do not end up stitching your finger accidentally.
Note: Follow the user manual as the process can differ depending on the brand.
In a regular sewing machine switch off the electric connection or remove your leg for the pedal to prevent accidents.
Many computerized machines now have a built-in safety mode that prevents accidental stitching and guides you step-by-step on bobbin setup via an LCD screen or companion app.
-
Putting the bobbin in a front-loading sewing machine
Front bobbin loading sewing machine
Step 1: The bobbin area is hidden behind the front extension table. Remove the extension table and open the front cover to get excess to the bobbin area.
Step 2: Pull out the bobbin case by holding the back latch with your left hand.
Step 3: Holding the bobbin case in the left hand, put the bobbin inside using your right hand, in a way that the thread ending faces clockwise direction.
Tips: The bobbin must unwind in a clockwise direction when you are pulling out the thread ending.
Step 4: Hold the thread a bit longer and pull it through the notch in the bobbin case, till it ends up in the small groove of a bobbin case. Here the thread becomes loose and easy to pull out.
Tips. Pull out the thread until the bobbin unwinds two to three rotations to check the thread tension.
Step 5: Now hold the latch located on the back of the bobbin case with your left hand push the bobbin case into the sewing machine bobbin area until it clicks.
Tips: After filling the bobbin case in its place please check by simply moving your hand over the bobbin. If fitted properly the bobbin will not move freely else fall to one side.
Note: If you’re struggling to fit in the bobbin case, turn the hand wheel toward you slightly to move the bobbin area to adjust the bobbin case inside the machine. Never turn the hand wheel in the opposite direction as it will jam the machine badly.
Step 6: Thread your needle. Hold the thread ending of the bobbin with your left hand and turn the hand wheel with your right hand towards you to form a complete rotation. This process will bring the bottom thread through the machine to the sewing plate. Pull both the threads about 4 inches long and start stitching.
-
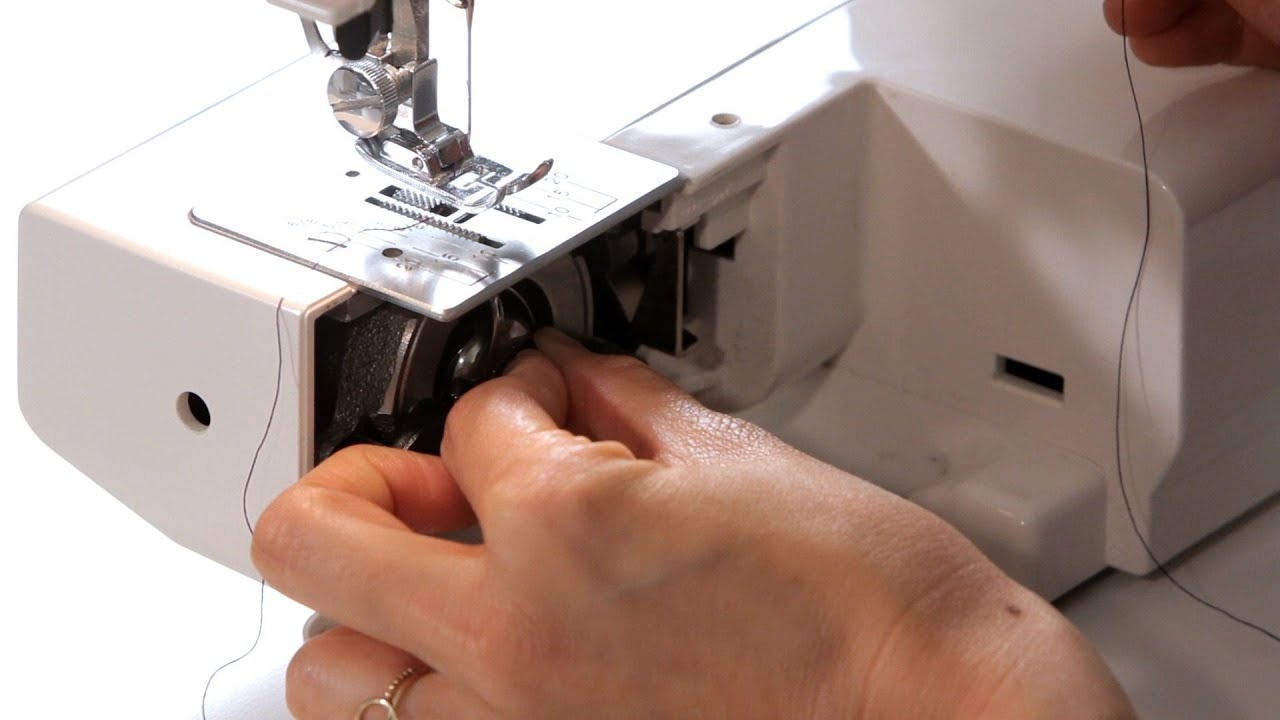
Putting the bobbin in a top loading sewing machine
Top bobbin loading sewing machine
The bobbin area is just in front of the feeding dog and is covered with a transparent plastic lid which makes the bobbin area visible from the outside.
Step 1: Raise the needle to the highest position by turning the hand wheel towards you. Remove the presser foot as it will create obstackle while putting the bobbin in. There is a small latch on the right-hand side of the bobbin area, slide it slightly to the right, and the plastic lid will be flung open at once.
Step 2: Now take the wound bobbin and drop it into the bobbin case in such a manner that when you pull the thread from the bobbin, the bobbin will rotate in an anti-clockwise direction.
Step 3: Hold the bobbin thread push it underneath the little plastic part and guide through the slit in the direction of the arrow and bring it to the needle plate.
Tips: This step makes the bobbin thread inter the “tension spring” of the bobbin case. This is how the tension of the thread is maintained for the bobbin thread while sewing.
Step 4: Put the bobbin lid back into place by sliding it into the small groove and gently pressing it down. You will hear a click and it is done.
Step 5: Use the cutter at the end of the slit to cut the extra thread. And your machine is ready for sewing.
Note: If your machine doesn’t have a thread cutter, bring the bobbin thread through the needle plate before sewing to avoid thread jamming your machine.
Step 6: If you quilt, embroider, or do any project where you need the bobbin thread along with the needle thread then turn the hand wheel towards you and complete one rotation. This will create a loop among both threads, and the bobbin thread is pulled out easily.
Smart Machines and Sustainability Trends
If you are using upcycled materials, ensure your bobbin tension is well adjusted to avoid puckering or missed stitches. Also, some machines now detect incorrect bobbin placement and alert the user, reducing beginner errors. Whether you are quilting, mending, or crafting, understanding your machine’s features can make the bobbin process smoother and more efficient.
FAQ
1. How to know if your bobbin is loaded correctly?
Ans- After loading the bobbin, pull the thread gently. If it flows smoothly, and the bobbin doesn’t fall out or jam, it’s placed correctly. In top-loading machines, ensure the thread passes through the tension slit and the bobbin rotates counter-clockwise.
2. What is the correct way to insert a bobbin in a sewing machine?
Ans- In top-loading machines, the bobbin should unwind counter-clockwise when dropped into the case. In front-loading machines, it should unwind clockwise when placed into the bobbin case. Always follow your machine’s manual for the best results.
3. Why does my bobbin keep jamming the thread?
Ans- Due to incorrect bobbin placement, loose winding, tangled thread, or skipping the tension slot. Always make sure the bobbin is wound evenly and inserted in the proper direction with the thread following the tension path.
4. Do computerized sewing machines need a different method to insert a bobbin?
Ans- Not exactly. Many modern computerized machines have added features like transparent lids, auto thread sensors, or LCD instructions to guide bobbin placement more easily and safely.
5. What is the difference between front-loading and top-loading bobbin systems?
Ans- Front-loading bobbins are often used in older or heavy-duty machines where bobbin cases are inserted manually. Top-loading bobbins are more common in modern machines and are easier to see and access, making them beginner-friendly.
6. Can I use any bobbin in any sewing machine?
Ans- No, always use a manufacturer-recommended bobbin type. Using the wrong size or style (metal or plastic, Class 15 or Class 66, etc) can lead to thread tension issues and damage your machine.
7. Why is the bottom thread not catching while sewing?
Ans- It means that the bobbin was not inserted properly or the needle is not threaded correctly. Try rethreading both the upper and lower threads, and make sure the bobbin is rotating in the correct direction.
8. How often should the bobbin thread need to be changed?
Ans- Replace or refill the bobbin whenever it’s running low. Larger projects like quilting or embroidery, consider winding several bobbins in advance to avoid interruptions.
9. Do I need to bring the bobbin thread up before sewing?
Ans- Yes, turning the handwheel once pulls up the bobbin thread. However, some newer machines automatically do this step or allow you to start stitching without manually pulling up the bobbin thread.
10. Is there a way to avoid bobbin thread tangles?
Ans – Yes, use evenly wound bobbins and ensure the bobbin is inserted correctly. Clean the bobbin case regularly, use quality thread, and always hold the upper thread when you begin stitching.
Conclusion:
Putting a bobbin in the sewing machine is an easy job, but you must pay attention in the process, if not done correctly it can damage the machine to such an extent that you would need to bring the machine to a repair center. I learned it from my experience of spoiling my machine. With modern machines offering helpful features and a growing emphasis on conscious sewing, taking the time to master this step will enhance your overall experience.