Why is my Sewing Machine Jamming?
Habits make a lot of difference in maintaining anything and everything. In the case of sewing machines too we have to follow certain good habits and stop many bad practices that may cause jamming. I have been regularly doing projects for 11 years and now it is like my best buddy so here are certain tips that if you also follow can keep your machine healthy in other words your machine will be in good condition. Today I will walk you through the most common topic “Why is my sewing machine jamming”.
Before knowing “why” you should always know “how”.
How not to jam your machine, follow these habits, and say “no” to them when using a sewing machine:
Habit 1:
Handling the hand wheel
Do not ever pull the hand wheel or turn the wheel away from you, that will jam your machine. Always pull the wheel towards you even if that means you have to make one more stitch to get the wheel where you need it to be. That is a wrong practice and bad for your machine.
Habit 2:
Thread positioning
Do not leave the threads too short, one coming out of the bobbin and the upper thread. The reason behind this is simple: if the thread is too short when you start your machine for any project the thread will suck back to the bobbin and here the jamming takes place. This is the first part and the second part continues with habit 3.
Habit 3:
Keep the extended threads behind the machine passing beneath the presser feet, if you don’t then there are high chances of the breakage of thread that can again lead to jamming your machine.
Habit 4:
Correct direction for bobbin inserting
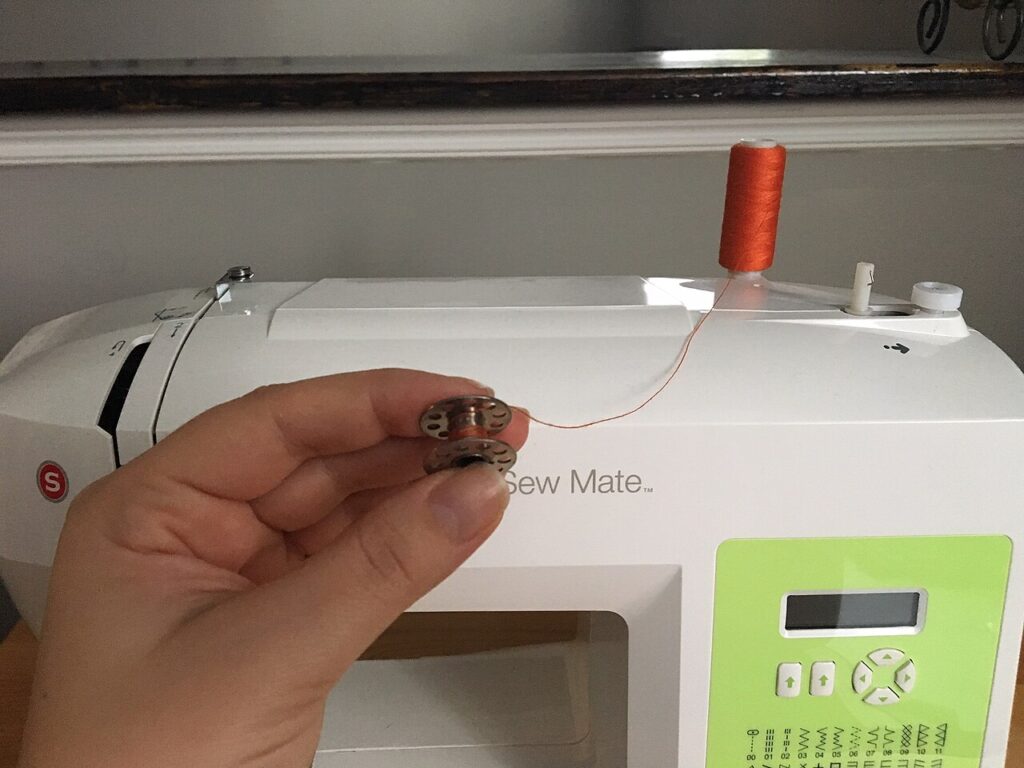
When you place the bobbin into the case, always remember to choose the correct direction. Hold the tip of the thread coming out of the bobbin and look through it. It symbolizes the letter ”P” and that is the correct position. Now you are ready to insert the bobbin in its case.
Reverse the side of the bobbin i.e., opposite “P”, in case your machine has a top load for the bobbin which generally does not have a bobbin case.
Habit 5:
Positioning of a sewing needle during threading
Be attentive when you are going to thread the bobbin from the spool, always check your machine needle should be free from the thread which can catch a clump of thread from the bobbin inserted area.
Advice – Good practice is to remove the upper thread from the needle as well as from the hook. It will help in not jamming through the needle and hook.
Habit 6:
Right placement of fabric
Be sure that your fabric is next to your needle during your project. Placing the fabric too far again results in jamming. If you are unsure how to hold it properly you can follow the process
Process – Just take a scrap cloth before the main fabric, raise the presser feet, place it beneath the needle, and lower the presser feet. Start sewing. This is how I used to do in my beginning days.
Habit 7:
Handling your machine
It may happen in a straight line stitch the line of stitch is not straight. You went off the track, stopped in the mid seam shifted the needle, and started sewing. This does not cause jamming but it is again bad practice. It shows how you are mishandling your machine.
Habit 8:
Position of needle
When you finish sewing, do not pull the fabric when the positioning of your needle is just a bit up on your fabric. Raise the needle to the top and then pull the finished material. The threads will easily come out. But if the needle is in a lowered position, it carries an excess thread, and pulling may result again in jamming or breaking of the needle due to heavy push.
What is thread jamming? Thread jamming means when you sew and the below part of the fabric has a bunch of thread gathered in one place like a nest. But if your machine sews and just looks messy, that is more likely to be a tension thread issue that is different.
The basic issues that may lead to thread jamming, and how to fix them:
Rethread your machine
If you are following all the above remedies, your machine is still jamming. You need to re-thread your top thread.
Reason – Quite often it is possible that the thread is not guided inside these tension discs properly, and it can cause all sorts of problems.
Re-inserting your bobbin
Pull the whole bobbin out and put it in the case, put it all back in, and try sewing.
Advice- Doublecheck if you have the right bobbin for your machine. Each machine is designed with a specific size, weight, and bobbin make.
Try a new needle
You will be surprised at how much a blunt needle, can cause you so many stitching problems. So just change your needle and put in a new one.
Test on a cotton fabric
Try to sew on plain cotton fabric, plain quilting cotton, no stretch fabric, or ground zero fabric.
Reason – Just to make sure that it is not the fabric you are using that is the cause of the issue. If so, then you need to adjust the tension of your machine, pressure foot, thread, and many more for the fabric you are sewing.
Cleaning the Bobbin area
If you have never done it before you will be surprised at how much a dirty fluff machine underneath can cause all of this. So you will need to pull out your bobbin, and bobbin case, take off the metal plate and pull it up, and do deep cleaning with a brush or a blower.
Try a new thread
Unknowingly you may happen you have picked up an old spool of thread. Thread the machine, both at the top and bobbin too, and not realize it because who knows the difference when you are just starting? It’s hard, trust me!
So try it with a new thread. That means both in your top and rewind another bobbin with a new thread.
Additional tips for sewing machine jamming:
Check your feed dogs – If your fabric isn’t moving and thread bunches up underneath, your feed dogs may be lowered. This might be possible if you recently did free-motion quilting or embroidery.
How to fix it?
Locate the feed dog lever which is usually at the backside of the machine. Make sure it’s raised before sewing and rethread after adjusting to reset tension.
Clean the tension disc – You may clean your bobbin space, but thread lint can also build up inside your upper tension discs, especially with cotton or metallic thread.
How to fix it?
Raise the presser foot, which opens the tension discs. Slide a piece of folded fabric between the discs to pull out hidden lint.
Timing issues – If your machine keeps jamming even after cleaning, re-threading, and changing needles. It could be a timing issue, where the needle and bobbin hooks are not in sync.
Signs of timing issues – The needle hits the bobbin case, you can often hear a clunking noise, and it can skip stitches or form thread nests.
How to fix it?
This is a mechanical issue handled by technicians only. But if you are experienced, refer to the service manual for timing alignment procedures.
Use the right presser foot for the fabric – Using the wrong presser foot can cause your fabric to fail to feed properly, especially with knits and thick materials. For your reference, use a walking foot for quilts or slippery layers. Teflon foot for vinyl or leather, and a zigzag foot allows space for wider stitches without jamming.
FAQ
1. Why does my sewing machine jam only with thick fabrics?
Ans. It could be due to an incorrect needle size or a lack of foot pressure. Try using a denim needle and increasing the stitch length.
2. Can the type of thread cause jamming?
Ans. Yes, low-quality or old threads often break, fray, and tangle inside your machine. Always use high-quality polyester or cotton thread and match it to your fabric.
3. How often should I service my sewing machine?
Ans. Depending on your usage, the servicing is done. If you are using daily or heavy fabrics. It might be every 3 months or 6 months.
4. Why does my sewing machine jam at high speed?
Ans. Sewing too fast can cause thread tangles and missed guides. This often happens with uneven thread tension or loose spool placement. Try slowing down, securing your spool with a cap, and double-checking your threading path.
5. Why does my machine jam when using a zigzag stitch?
Ans. It could be using the wrong presser foot or a narrow needle plate. Switch to a zigzag or open-toe foot and ensure the needle doesn’t hit the plate during side movement.
Conclusion
If you have tried and tested all the possible ways, you can do it yourself at home but still, your sewing machine is recurring with the same problem. Don’t be frustrated and start pulling out things from your machine. If you are unable to figure it out, then it is time to call for a professional and have it serviced.
One Comment