Why is my Sewing Machine Not Stitching? [9 Solutions]
When you sit down, all excited to start a sewing project, and realize that your machine is playing a little prank on you, going for a tea break without telling you! It’s like when your computer decides to update right when you are about to do something important. Jokes apart.
What are the main causes?
The main causes for a sewing machine not stitching can vary, but they all fall under a few key categories:
-
Threading Issues
Incorrect threading
Cause – The sewing machine might not stitch if it is threaded incorrectly. Even minor mistakes in the threading path can prevent the machine from forming stitches.
Solution
- Rethread the machine – Carefully thread the upper thread, ensuring it passes through all the guides, tension discs, and the needle eye correctly.
- Use high-quality thread – Ensure that you use good-quality thread, that does not break easily or cause tangles.
Advice – Refer to the user manual for proper threading steps.
Thread tangles
Cause – Tangled or knotted thread can get caught in the machine leading to jams or skipped stitches.
Solution
- Remove the tangles – Stop the machine, gently remove the fabric, and untangle the threads. If the thread is knotted in the bobbin area, clear and rethread it.
- Prevent future tangles – Ensure the thread is wound properly on the bobbin, and the thread spool is placed correctly on the spool pin.
Advice – Regularly check the thread for any knots and rethread if necessary.
-
Bobbin Problems
The bobbin plays a crucial role in the stitch formation process.
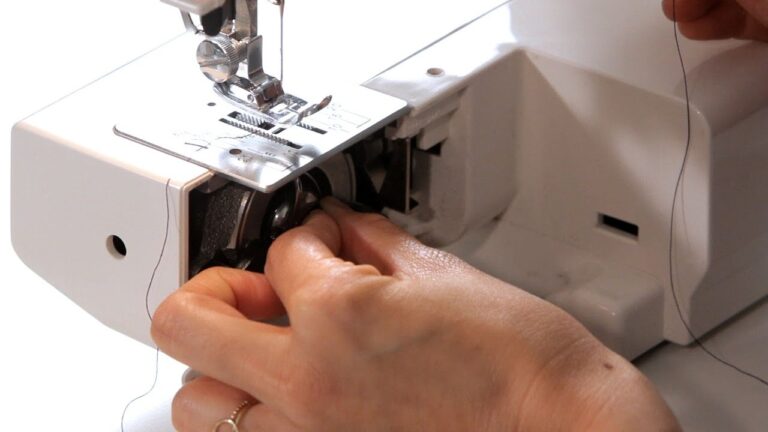
Improper bobbin insertion
Cause – If the bobbin is not seated correctly in its case, the sewing machine may not be able to pick up the bobbin thread, resulting in no stitches.
Solution –
- Reinsert the bobbin – Remove the bobbin and reinsert it, make sure it’s correctly positioned according to the machine’s user manual. The thread should unwind in the correct direction.
- Use a compatible bobbin – Ensure the bobbin size and type are compatible, with your sewing machine model.
Bobbin tension issues
Cause – Incorrect bobbin tension can lead to loose stitches or prevent the machine from stitching altogether.
Solution
- Adjust the bobbin tension – Use a small screwdriver to adjust the tension screw on the bobbin case.
- Check the bobbin winding – Ensure the bobbin is wound evenly. If the thread is uneven or loose on the bobbin, rewind it.
-
Needle Issues
A bent or dull needle
Cause – A bent or dull needle cant pass through the fabric properly, leading to skipped stitches or no stitching.
Solution
- Replace the needle – Change the needle to a new one, that is appropriate for the fabric you are working with. Regularly replace the needle to maintain good stitching quality.
- Check needle size – Make sure the needle size is suitable for the thread and fabric. Use a thicker needle for heavy fabric and a finer needle for delicate fabrics.
Incorrect needle insertion
Cause – If the needle is not fully inserted or is facing the wrong direction, it won’t pick up the bobbin thread correctly.
Solution –
- Reinsert the needle – Loosen the needle clamp, insert the needle up with the flat side facing the correct direction( towards the back), and tighten the clamp securely.
-
Tension problems
Upper thread tension too tight or too loose
Cause – Improper upper thread tension can cause issues like loose stitches, skipped stitches, or thread breakage.
Solution
- Adjust the tension dial – Set the tension dial to the middle range.
- Check for thread obstacle – Ensure the thread isn’t caught or stuck anywhere in the thread path, which can affect tension.
Improper tension settings
Cause – Fluctuating tension can lead to uneven stitches, causing frustration during sewing.
Solution
- Compatible settings – Keep the tension settings compatible throughout your project, especially when using the same type of fabric and thread.
-
Machine settings
Wrong stitch length or width
Cause – Using incorrect stitch length or width settings can cause poor stitch quality or prevent stitching altogether.
Solution
- Adjust stitch settings – Set the stitch length and width to appropriate levels for your fabric and project.
Advice – For thicker fabrics use a longer stitch length, and for finer fabrics, a shorter length may be better.
Incorrect stitch selection
Cause – Selecting the wrong stitch type.
Solution
- Choose the correct stitch – Select a stitch type, that matches your fabric and project.
For example, use a straight stitch for basic seams and a zig-zag stitch for stretchable fabrics.
-
Fabric and Thread compatibility
Source: wikimedia.org
Unsuitable fabric choice
Cause – Certain fabrics, like very thick or delicate ones, can cause stitching issues if your machine isn’t set up correctly.
- Solution
Adjust machine settings – Change the needle, thread, and tension settings to match the fabrics. Use a walking foot or specialized presser foot for delicate or slippery fabrics.
Advice – For delicate fabrics use stabilizers to provide extra support during sewing.
Mismatched thread type
Cause – Using the wrong thread type for your fabric or needle can cause the machine to skip stitches or stop stitching altogether.
Solution
- Match thread to fabric – Choose a thread that matches your fabric’s weight and type.
For example, use polyester thread for stretch fabrics, and cotton thread for natural fibers.
- Check thread quality – Use high-quality thread that is strong and smooth to avoid breakage and tangles.
-
Mechanical issues
Machine Jammed
Cause – A jammed sewing machine often due to thread bunches or fabric caught in the feed dogs, can prevent the machine from stitching.
Solution
- Clear the jam – Turn off the machine and remove the fabric, bobbin, and needle plate to access and remove the jammed thread or fabric. Clean out any debris with a small brush.
- Regular cleaning – After every project, clean the bobbin area and under the needle plate to prevent future jams.
Worn or damaged parts
Cause – Over time, components like the feed dogs, needle plate, or bobbin case can wear out or get damaged, affecting the machine’s ability to stitch.
Solution
- Inspect and replace parts – Regularly inspect these parts for wear and tear. Replace any damaged or worn parts according to the manufacturer’s guidelines.
- Regular maintenance – Schedule regular maintenance with a professional to keep your machine in good condition.
-
Foot Pedal problems
Malfunctioning foot pedal
Cause – if the foot pedal isn’t functioning correctly, the machine may not respond or stitches as expected.
Solution
- Check the connection – Ensure the foot pedal is properly plugged into the machine. If the connection is loose, it might not work correctly.
- Replace if necessary – If the foot pedal continues to malfunction, consider replacing it with a compatible model.
-
Lack of regular maintenance
Dust and lint
Cause – Dust, lint and loose threads can accumulate in your sewing machine’s parts, leading to poor performance and stitching issues.
Solution
- Regular cleaning – Use a small brush or compressor air to clean out the bobbin area, and feed dogs, and other parts of the machine after each project. This prevents lint from being increased.
Avoid blowing directly – Avoid blowing directly into the machine, as this can push debris further into the machine.
Insufficient lubrication
Cause – Without proper lubrication, the moving parts of your sewing machine can become stiff leading to stitching problems.
Solution
- Lubricate regularly – Follow your machine’s manual to apply sewing machine oil to the designated parts.
Advice – Avoid over-oiling, as excess oil can attract dust and lint.
Use the right oil – Always use sewing machine-specific oil as other types of oil can gum up the machine’s mechanisms.
-
When to look for professional help
Persistent issues after troubleshooting
Cause – If you have tried all possible troubleshooting steps and your sewing the machine still isn’t stitching properly, it may be due to a more serious problem.
Solution
- Consult a professional – Take your machine to a certified technician who can diagnose and repair the issue. They can identify problems that aren’t easily fixable at home.
Unusual noises or movements
Cause – Strange noises or jerky movements while sewing can indicate a mechanical issue that requires repairing, immediately.
Solution
- Stop and inspect – Turn off the machine immediately to prevent further damage. Inspect for obvious problems like loose parts or debris.
- Contact for repair services – If the issue persists, contact a professional repair service to assess and fix the problem.
Here are more potential reasons for your sewing machine might not be stitching:
1. Bobbin Winder shaft in the wrong position
Cause – If your sewing machine has a bobbin winder on the top, check its position. When the shaft is pushed to the right, the winding position is. The needle may not engage at all , leading to the machine running but not stitching.
Solution – Move the bobbin winder shaft fully to the left. This simple fix is often overlooked and can immediately solve the issue.
2. Damaged Needle Plate
Cause – A scratched or bent needle plate can prevent the needle from entering the fabric cleanly, disrupting stitch formation.
Solution – Inspect the needle plate for any signs of wear and burrs. (Burr refers to a small rough edge formed on the needle plate by the needle striking the plate.) If the hole is damaged or uneven, replace the plate to avoid skipping stitches or thread jams.
3. Stitch selector not fully engaged
Cause – If the stitch selector dial or button is not clicked into place, the machine may fail to form stitches. Partial selected or misaligned stitches confuse the internal timing mechanism, especially on older or analog machines.
Solution – Re-select the stitch. Make sure it clicks into place completely. For digital machines, reset to the default straight stitch and test again.
4. Update firmware for computerised machines
Cause- If you own a computerized machine that suddenly stops stitching or behaves oddly, then it could be due to a software glitch. Some modern machines allow for firmware updates to fix internal bugs or improve stitch consistency.
Solution – Visit your sewing machine manufacturer’s website to check if your model supports firmware updates. Some updates may require a USB connection or must be installed by a certified technician.
Conclusion
If your sewing machine is not stitching, refer to the solutions provided here, by checking and adjusting, you can get back to your sewing with ease.
